If you’re a sourdough enthusiast, chances are you’ve often wondered what to do with your sourdough discard. Well, wonder no more! This easy, no-fail recipe for sourdough tortillas is here to save the day.
These tortillas are soft, flavorful, and perfect for wraps, tacos, or even as a snack on their own. The best part? They’re quick to make and require just a few simple ingredients!
Whether you’re a seasoned baker or new to sourdough, this recipe is approachable, versatile, and guaranteed to become a staple in your kitchen. Let’s dive into how you can whip up these tasty tortillas in under 40 minutes.
Why Sourdough Tortillas?
Sourdough discard often gets overlooked, but it’s a treasure trove of flavor waiting to be used. By incorporating it into tortillas, you not only reduce waste but also add a subtle tangy flavor that elevates the humble tortilla to a whole new level. Plus, homemade tortillas are miles better than store-bought ones—soft, fresh, and free of preservatives.
Ingredients You’ll Need
This recipe keeps things simple. You likely already have most of these ingredients in your pantry:
- ½ cup sourdough starter discard
- ¼ cup olive oil
- ⅓ cup water
- 1 ⅔ cups all-purpose flour
- ½ teaspoon salt
That’s it! Just five ingredients for perfectly soft and flavorful tortillas.
Step-by-Step Instructions
1. Mix the Wet Ingredients
In a large bowl, combine the sourdough discard, olive oil, and water. Give it a good stir until everything is well mixed.
2. Add the Dry Ingredients
Next, add the all-purpose flour and salt to the bowl. Mix until a dough starts to form. Knead the dough for 1–2 minutes, either by hand or using a stand mixer. The dough should be smooth and homogeneous, with no dry spots. If it feels too sticky, sprinkle in an additional tablespoon of flour and knead until it’s workable.
3. Rest the Dough
Cover the dough with a damp towel and let it rest for 30 minutes. This step is crucial for allowing the gluten to relax, making the tortillas easier to roll out later.
4. Divide and Roll Out
Lightly flour your work surface to prevent sticking. Divide the dough into 8–10 equal pieces and shape each piece into a ball. Flatten each ball slightly with the palm of your hand, then use a rolling pin (or even a wine bottle!) to roll them out into thin circles about ¼ inch thick. The thinner, the better—aim for almost see-through tortillas!
5. Cook the Tortillas
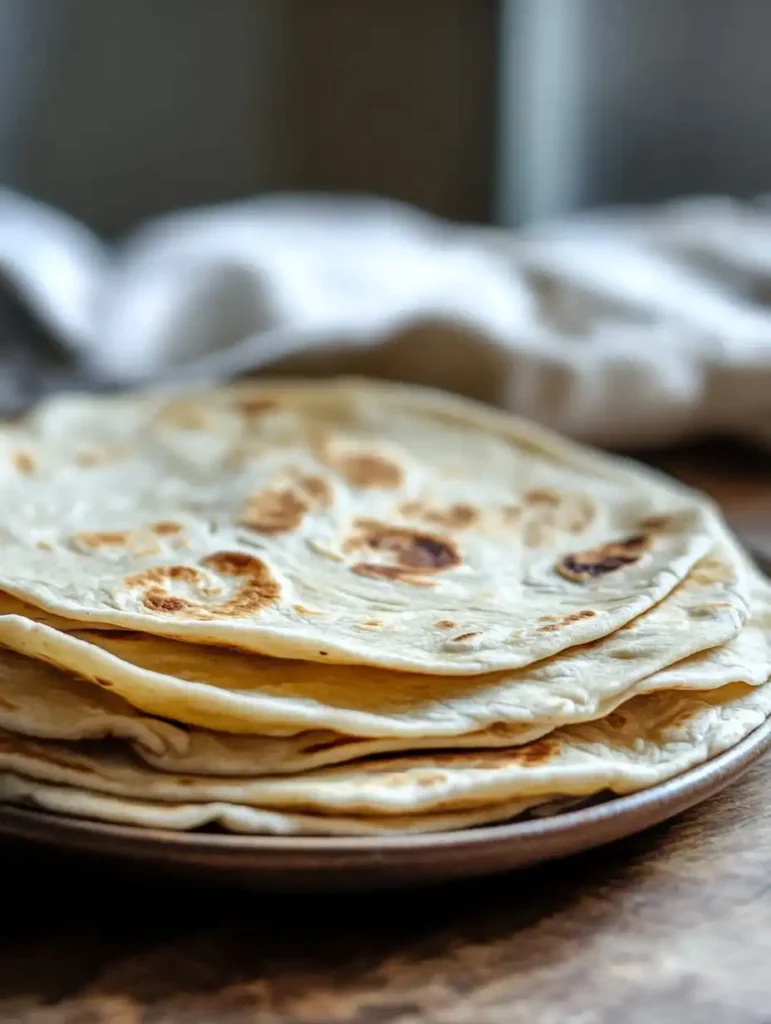
Preheat a large skillet over high heat. Once hot, cook each tortilla individually for about 1 minute on each side. Flip as soon as bubbles appear and the edges look firm. You’re aiming for golden brown spots on each side—these are the hallmark of a perfect tortilla!
6. Cool and Store
Allow the tortillas to cool completely before storing them in an airtight container. They’ll stay fresh for 3–5 days at room temperature or can be frozen for longer storage.
Tips for Success
- Dealing with Sticky Dough: If your dough feels too sticky to handle, sprinkle in small amounts of flour (about 1 tablespoon at a time) until it’s easy to work with.
- Rolling Thin: Don’t skip rolling the tortillas thin! This ensures they cook evenly and have that soft yet slightly chewy texture we all love.
- Cooking Quickly: High heat is key when cooking tortillas. This helps them puff up slightly and develop those signature brown spots without drying out.
Variations to Try
One of the best things about this recipe is its versatility! Here are some fun ways to customize your sourdough tortillas:
- Whole Wheat Version: Swap in some whole wheat flour for a nuttier flavor and added fiber. Use ¾ cup all-purpose flour and ⅔ cup whole wheat flour as a starting point. If you’re feeling adventurous, try using only whole wheat flour—just be prepared to adjust the water or flour amounts as needed to achieve the right dough consistency.
- Herbs and Spices: Add a pinch of garlic powder, cumin, or chopped fresh herbs to the dough for an extra burst of flavor.
- Cheesy Tortillas: Sprinkle shredded cheese onto the rolled-out dough before cooking for melty, cheesy goodness.
Storing and Freezing
Homemade tortillas are best enjoyed fresh, but they store beautifully too:
- Short-Term Storage: Keep them in an airtight container at room temperature for up to 3–5 days. Gently reheat them on a skillet or in the microwave before serving.
- Freezing: To freeze, let the tortillas cool completely first. Place parchment or wax paper between each tortilla to prevent sticking, then store them in a ziplock bag or airtight container. They’ll keep well in the freezer for up to 2 months.
Nutrition Information
Here’s what you can expect per serving (1 tortilla):
- Calories: 182 kcal
- Carbohydrates: 26g
- Protein: 4g
- Fat: 7g (including 6g polyunsaturated fat)
- Sodium: 147mg
- Fiber: 1g
These tortillas are not only delicious but also relatively light compared to many store-bought options.
Final Thoughts
Making sourdough tortillas at home is easier than you think—and so worth it! With just five pantry staples and under 40 minutes of your time, you can enjoy soft, flavorful tortillas that will elevate any meal. Whether you’re using them for tacos, wraps, or dipping into hummus, these tortillas are sure to impress.
So next time you’re staring at your jar of sourdough discard wondering what to do with it, give this recipe a try. It’s simple, satisfying, and guaranteed to become one of your go-to recipes!
Happy cooking!
PrintThe Best Sourdough Tortilla

These sourdough tortillas are super tasty and easy to make. Best part: you finally have a delicious no-fail recipe to use your sourdough discard!
- Prep Time: 5 minutes
- Cook Time: 2 minutes
- Total Time: 37 minutes
- Yield: 8-10 tortillas
- Category: Bread, Tortillas
- Method: Stovetop
- Cuisine: Mexican
- Diet: Vegetarian
Ingredients
- ½ cup sourdough starter discard
- ¼ cup olive oil
- ⅓ cup water
- 1 ⅔ cup all-purpose flour
- ½ teaspoon salt
Instructions
- In a large bowl, mix the sourdough discard, olive oil, and water. Stir to combine.
- Add the all-purpose flour and salt, mixing until the dough is formed. Knead for 1 to 2 minutes, just until everything is well combined and the dough looks homogeneous, with no dry spots. You can use a stand mixer if you prefer. If your dough is too sticky, add 1 tablespoon more of all-purpose flour and knead until absorbed.
- Cover the dough with a damp towel and let it rest for 30 minutes.
- Preheat a large skillet on high heat.
- Lightly flour the surface you’re rolling the dough on. Divide the dough into 8 to 10 pieces. Flatten each ball with the palm of your hand.
- Roll out each piece of dough into a circle using a rolling pin or a wine bottle. The tortillas should be rolled thin (about ¼ inch thickness) and will look almost see-through.
- Cook each tortilla individually on high heat for about 1 minute on each side. Flip as soon as bubbles appear and the edges look firm—the tortilla should have nice brown spots.
- Allow them to cool before storing in an airtight container. Serve warm.
Notes
- Tortillas keep for 3 to 5 days outside the fridge.
- To freeze, wait for them to cool. Use a ziplock bag or airtight container, and separate each tortilla with wax or parchment paper.
- The recipe can be made with active sourdough as well—it won’t change the final result.
- The recipe can be made with whole wheat: use ¾ cup of all-purpose flour and ⅔ cup of whole wheat flour. If using only whole wheat, start with 1 ½ cups of whole wheat flour and add more as needed until you get a dough that doesn’t stick when rolling.
Nutrition
- Serving Size: 1 tortilla
- Calories: 182 kcal
- Sugar: 0g
- Sodium: 147mg
- Fat: 7g
- Saturated Fat: 1g
- Unsaturated Fat: 6g
- Trans Fat: 0g
- Carbohydrates: 26g
- Fiber: 1g
- Protein: 4g
- Cholesterol: 0mg


Leave a Comment